
Exterior Painting Cedar Siding Tips for a Long Lasting Finish

Cedar siding can make a home look warm, natural, and timeless, but it will not stay that way on its own. Sun, rain, snow, humidity, and temperature swings all work against the finish. If the surface is not cleaned, repaired, primed, and painted the right way, even high-quality exterior paint can fail early.
The good news is that cedar takes paint well when it is prepared correctly. The key is to respect the wood. Cedar is porous, rich in natural oils, and sensitive to moisture. A long lasting finish starts before the first coat goes on.
This guide covers practical tips for painting cedar siding so the finish looks clean, bonds well, and holds up through changing weather.

Know what makes cedar siding different
Cedar is not the same as fiber cement, vinyl, or pine trim. It has its own behavior, and that affects how paint performs.
Cedar contains natural extractives, often called tannins. These compounds can bleed through paint if the siding is not sealed with the right primer. The result is brown or yellow staining, often around knots, nail heads, or areas that get wet often.
Cedar also expands and contracts as moisture levels change. Paint needs to bond tightly and remain flexible enough to move with the wood. If moisture gets trapped behind the coating, the paint can blister, peel, or crack.
A good cedar paint job depends on three things:
Dry wood
Clean, sound surfaces
The right primer and paint system
When one of those is skipped, the finish may still look good for a short time. The problems usually show up after a season or two.
Inspect the siding before choosing paint
Before planning colors or buying supplies, walk around the house and inspect the siding closely. Look at both the sunny and shaded sides. South- and west-facing walls often weather faster because they get stronger sun exposure. North-facing walls may show more mildew because they dry more slowly.
Check for:
Peeling or flaking paint
Gray, weathered wood fibers
Soft or rotted boards
Open joints or gaps
Rust stains around fasteners
Mildew or algae
Cracked caulk
Water stains under gutters or windows
Press gently on suspect boards with a screwdriver or painter’s tool. Cedar should feel firm. If it feels spongy, crumbles, or holds moisture, painting over it will not solve the problem. Replace damaged boards before coating the wall.
Also pay attention to the edges and ends of boards. End grain absorbs moisture faster than the face of the siding. If those areas are bare or poorly sealed, they can pull water behind the paint film.
Clean cedar siding without damaging the wood
Cedar needs to be clean before painting, but aggressive cleaning can do real damage. High-pressure washing can tear up soft cedar fibers, force water behind the siding, and leave the surface fuzzy. That makes it harder for paint to form a smooth, strong bond.
A safer approach is to wash the siding with a garden hose, siding cleaner, and a soft-bristle brush. For mildew, use a cleaner made for exterior surfaces and follow the label directions. Rinse thoroughly so no residue remains.
Let the siding dry fully after washing. This step matters more than many people think. Paint applied over damp cedar can trap moisture, which often leads to peeling.
Dry time varies based on weather, shade, temperature, and siding condition. Bare or weathered cedar may hold more moisture than previously painted wood. If there has been recent rain or heavy humidity, give the siding extra time.
Paint sticks best to cedar when the wood is clean, dry, and stable. Rushing the drying stage is one of the easiest ways to shorten the life of the finish.
Remove loose paint and sand weathered areas
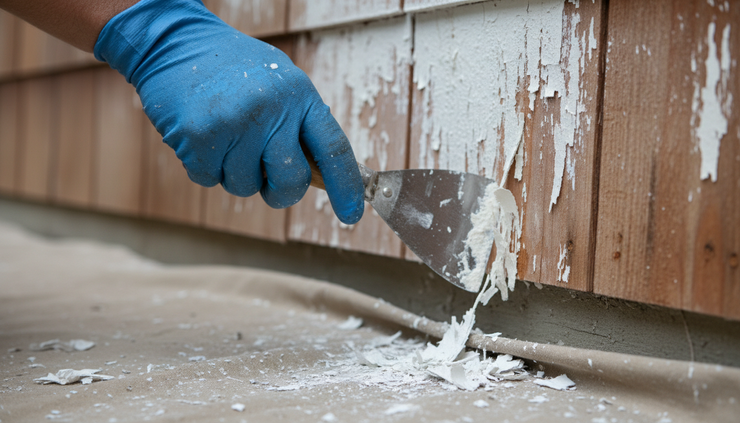
New paint needs a firm surface. If old paint is peeling, bubbling, or cracking, scrape it back until only sound coating remains. Use a paint scraper, putty knife, or carbide scraper where needed. Do not gouge the cedar.
Feather-sand the edges where bare wood meets old paint. This helps the new coating transition smoothly instead of highlighting ridges. Sanding also removes loose gray wood fibers from weathered cedar.
For larger areas, a random orbital sander can help, but use care. Cedar is soft. Heavy sanding can leave swirls or uneven spots that show through the finish.
Focus sanding on:
Peeling paint edges
Rough exposed wood
Weathered gray areas
Glossy old paint that needs better grip
Raised grain caused by harsh washing or sun exposure
After sanding, brush or rinse away dust. Paint and primer will not bond well to a dusty surface.
Prime cedar with the right product
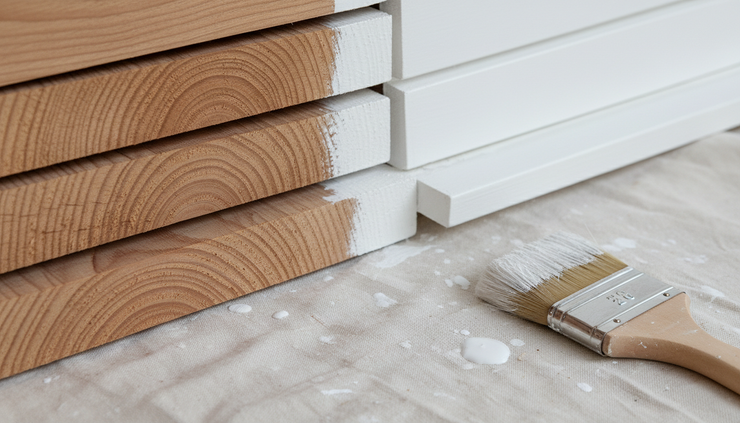
Primer is one of the most important parts of painting cedar siding. It seals the surface, improves paint adhesion, and helps block tannin bleed.
For bare cedar, choose a high-quality exterior wood primer designed to block stains. Many painters use an oil-based or alkyd stain-blocking primer for bare cedar because it seals extractives well. Some premium water-based stain-blocking primers can also work, but the product label should clearly say it is suitable for cedar or tannin-rich wood.
Do not use ordinary drywall primer, interior primer, or a basic latex primer that is not made for exterior wood. Cedar demands more.
Prime all bare spots, exposed end grain, knots, and repaired areas. If the siding is mostly bare or heavily weathered, full priming is better than spot priming. Full priming creates a more even base for the topcoat and helps reduce uneven sheen.
Pay special attention to these areas:
Bottom edges of siding boards
Ends near trim and corners
Joints around windows and doors
Knotty areas
Nail holes and exposed fasteners
Old scraped spots
Let primer dry as directed on the label. Do not rush the topcoat. Primer that has not cured enough can weaken the whole paint system.
Choose paint that can handle exterior cedar
Once the cedar is properly primed, use a high-quality exterior acrylic latex paint. Acrylic paint stays flexible, resists fading well, and handles seasonal movement better than many harder coatings.
Choose paint labeled for exterior wood siding. A cheap paint may save money at the register, but it usually costs more in labor later if it fades, chalks, or peels too soon.
For sheen, satin or low-luster finishes often work well on cedar siding. They shed water better than flat paint and show fewer surface flaws than high-gloss paint. Flat paint can look attractive, especially on older homes, but it may hold dirt and mildew more easily. Glossy paint can highlight every uneven board and old paint edge.
Color also affects performance. Dark colors absorb more heat, which can increase expansion and contraction. On cedar siding that gets strong afternoon sun, a medium or lighter color may help reduce stress on the coating.
Exterior painting siding made from cedar is less about one perfect product and more about using compatible layers: clean wood, stain-blocking primer, and durable exterior acrylic paint.
Paint in the right weather
Weather can make or break an exterior paint job. Even the best paint will struggle if applied in poor conditions.
Avoid painting when:
Rain is expected before the paint can dry
The siding is damp from dew or washing
The surface is hot to the touch
Temperatures are outside the paint label range
Direct sun is baking the wall
Wind is blowing dust, leaves, or debris into wet paint
Mild, dry days are best. Start on the shaded side of the house when possible and follow the shade as the sun moves. This gives paint more time to level and bond before it dries.
Morning dew is another concern. Cedar can look dry while still holding moisture. If the siding feels cool and damp, wait. Painting too early in the day can trap moisture. Painting too late can expose fresh paint to evening dew before it has had enough time to set.

Use the right tools and technique
Cedar siding has texture, joints, and edges that need full coverage. Spraying can be fast, but paint still needs to reach grooves and seams. Brushing and rolling help work paint into the wood.
A common method is to spray and back-brush. The sprayer applies paint quickly, then a brush pushes it into the siding texture. This can create better contact and a more even finish. For smaller projects, brushing and rolling can work well.
Use a high-quality brush for edges, trim lines, and underside laps. Use a roller with the right nap for the siding texture. Rougher cedar may need a thicker nap to get into the grain.
Work in manageable sections. Keep a wet edge so lap marks do not form. Paint from one natural break to another, such as corner to corner or window to trim.
Do not stretch the paint too thin. A thin coat may look covered when wet but fail to protect the cedar. Follow the coverage rate on the paint can. Cedar texture and weathered surfaces often require more product than smooth siding.
Apply two finish coats when needed
One coat of paint over primer may look acceptable, but two finish coats usually give better color depth, coverage, and durability. This is especially true when changing colors, covering dark or stained areas, or painting weathered cedar.
Two coats help build a stronger protective film. The first coat bonds to the primed surface. The second coat evens out color and improves resistance to weather.
Let the first coat dry according to the manufacturer’s directions before adding the second. Dry to the touch does not always mean ready to recoat. If paint is recoated too soon, it can dry unevenly or stay soft longer than expected.
Look closely after the final coat dries. Check under laps, around window trim, and near corners. Thin spots are common in these areas and should be touched up before the job is considered done.
Seal gaps, but do not trap moisture
Caulk helps keep water out of joints and cracks, but it must be used correctly. Use a high-quality exterior paintable caulk where siding meets trim, around doors and windows, and at small gaps that should be sealed.
Do not caulk the horizontal underside of lap siding unless the siding design calls for it. Cedar siding needs a way to drain and dry. Blocking natural drainage paths can trap moisture behind the boards.
Replace cracked or failing caulk before painting. Remove loose caulk, clean the joint, and apply a smooth bead. Let it cure as directed before painting over it.
Use caulk for narrow gaps, not for large repairs. If a gap is too wide, fix the underlying issue with proper carpentry instead of filling it with a thick bead of caulk.
Pay attention to end grain and cut edges
End grain is one of cedar’s most vulnerable areas. It acts like a bundle of straws, pulling moisture into the board. If the end grain is not sealed, water can enter behind the paint and cause peeling from the inside out.
When replacing boards, prime all sides when possible before installation. At minimum, prime every cut edge. This includes cuts near corners, windows, doors, and roof lines.
For existing siding, brush primer into exposed ends and seams. Use the brush to push coating into the wood, not just across the surface.
This small detail can make a noticeable difference in how long the paint job lasts.
Avoid common cedar painting mistakes
A lot of cedar paint failures come from avoidable shortcuts. The work may look fine at first, but the finish breaks down faster.
Common mistakes include:
Painting over damp siding
Skipping stain-blocking primer on bare cedar
Using interior or low-grade paint outside
Leaving loose paint under the new coating
Caulking areas that need drainage
Painting in direct hot sun
Applying coats too thin
Ignoring exposed end grain
Painting over mildew instead of cleaning it
Another common issue is waiting too long to repaint. Once paint has fully failed and cedar has turned gray or fuzzy, prep work becomes more intense. It is easier to maintain a sound coating than to restore one that has broken down.
Maintain the finish after painting
A long lasting cedar paint job still needs basic care. Dirt, mildew, clogged gutters, and splashback can shorten the life of the coating.
Inspect the siding once or twice a year. Spring and fall are good times. Look for small cracks, peeling spots, or areas where water hits the siding often.
Simple maintenance can include:
Rinsing dirt from siding with a garden hose
Cleaning mildew before it spreads
Keeping shrubs trimmed away from the wall
Clearing gutters so water does not spill down siding
Touching up small bare spots early
Checking caulk around windows and doors
Do not let sprinklers hit cedar siding every day. Repeated wetting can create mildew and paint problems, especially near the bottom boards.
Also check the lower sections of siding near decks, patios, and soil. These areas often get more splashback and may need attention sooner than higher walls.
When to repaint cedar siding
There is no single schedule that fits every home. Climate, sun exposure, paint quality, prep work, and maintenance all affect timing.
Instead of painting by the calendar alone, watch the condition of the finish. Repaint before the coating fully fails.
Signs it is time include:
Fading that looks uneven or chalky
Hairline cracks in the paint film
Small areas of peeling
Exposed bare wood
Failing caulk
Stains bleeding through the coating
Boards absorbing water instead of shedding it
If the paint is mostly sound, a maintenance coat may be enough after cleaning and light prep. If there is widespread peeling or bare cedar, plan for heavier scraping, sanding, priming, and repair.
A long lasting cedar finish starts with patience
Cedar siding rewards careful work. The best results come from slowing down during prep, choosing the right primer, painting in good weather, and sealing the vulnerable edges. Shortcuts usually show up later as peeling, staining, or premature fading.
A strong finish needs more than color. It needs a clean surface, dry wood, a primer that blocks cedar tannins, and paint that can handle outdoor movement. Treat each step as part of the same system, and cedar siding can stay protected and attractive for years.
Comments